NordVPN’s split tunneling allows you to grant trusted apps/internet programs direct access to the internet for lightning-fast speed without losing VPN protection for sensitive data on the relevant apps that need it.
If you have no clue about split tunneling or wonder if it’s just a gimmick, you’re in luck.
Continue reading to learn all there is to know about NordVPN Split Tunneling.
What Exactly Is Split Tunneling on NordVPN?
Split tunneling on NordVPN gives you the benefit of two tunnels, allowing you to send some internet traffic through the VPN’s encrypted tunnel while the rest goes outside the VPN.
This might sound absurd since you’re paying for a VPN to ensure your internet traffic is encrypted. So, why would you want traffic outside the encrypted tunnel?
In the rest of this guide, I’ll discuss the advantages and disadvantages of NordVPN’s split tunneling and when to enable it.
How to Set Up NordVPN Split Tunneling? (Step-By-Step Guide)
Enabling split tunneling on NordVPN is quite straightforward.
Here’s what you need to do:
- Purchase a NordVPN subscription.
- Download the NordVPN app for your preferred devices. Split tunneling is available on Android OS and NordVPN’s PC apps.
- Launch the NordVPN desktop app and click on the settings cogwheel icon at the top-bottom corner.

- Select “Split tunneling” from the Settings menu.

- Toggle the switch to activate split tunneling.

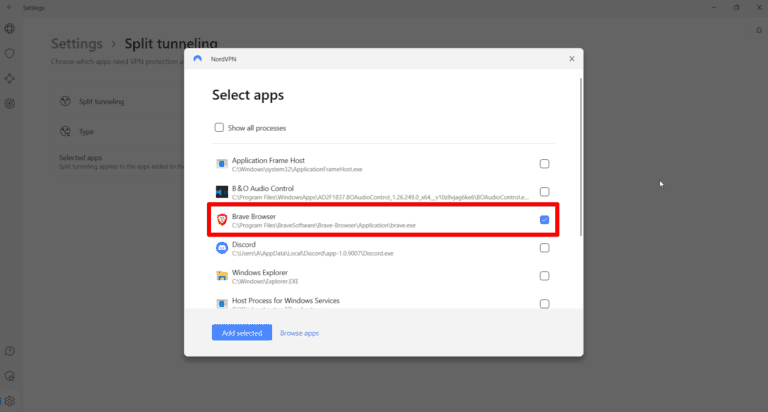
- If you select the first option, click on the “Add selected” button from the bottom-left corner and select all the apps you want to exclude from the VPN tunnel.

- If you select the second option, choose the apps to include in the VPN tunnel.
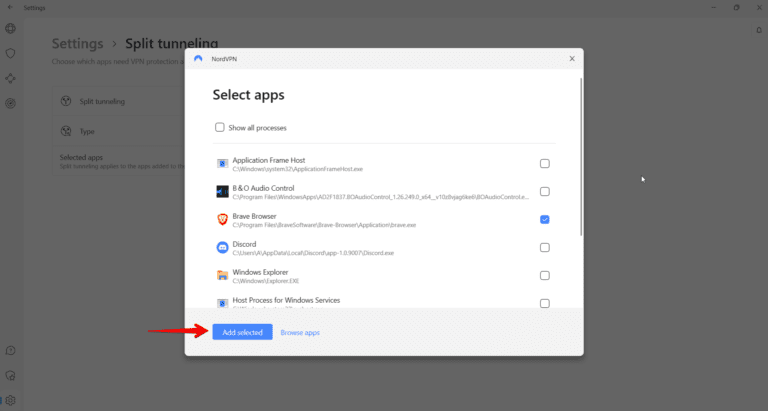
- Connect to any of NordVPN’s 5200+ servers and relish its split tunneling!
How to Set Up Split Tunneling via NordVPN’s Browser Extension?
If you’re on a chromium-based browser, you can follow this alternative method to turn on NordVPN split tunneling via an extension:
- Download the NordVPN Chrome extension from the Google Chrome web store.
- Click “Add to Chrome.”

- A pop-up will appear asking you if you want to add the extension. Select “Add extension.”

- Then, a NordVPN logo will appear on the toolbar in the top-right corner. Click on the logo and log in to your Nord Account.

- Head to VPN settings by clicking on the second globe icon in the top left corner of the extension window.

- Click on the “Split tunneling” option to disable VPN for selected websites.

- Enter the websites you want to bypass the VPN tunnel by clicking on the “Add” button.

Reasons You May Need NordVPN’s Split Tunneling
You may need split tunneling on NordVPN for these reasons:
- Enhance Speed: NordVPN’s split tunneling allows you to protect certain apps that manage your sensitive data while the rest go full-throttle for lightning-fast speeds.
- Access LAN Devices: If you’re facing difficulties connecting to a printer or other locally connected devices, your NordVPN connection may be the culprit. However, configuring NordVPN’s split tunneling allows you to fix this issue.
- Simultaneously Consume Local and Foreign Content: Split tunneling lets you unblock foreign content on certain apps (like Netflix) while remaining on the local network for other location-sensitive apps. So, there’s no need to keep connecting and disconnecting the VPN.
Drawbacks to NordVPN's Split Tunneling
As much as I love to use the NordVPN split tunneling feature when I can, it’s not without drawbacks. Some notable drawbacks of this feature include the following:

- Proneness to cyber-attacks on unencrypted traffic: NordVPN’s split tunneling lets anyone use a VPN-secured and open network simultaneously. This may lead to unencrypted online activity being vulnerable to hackers.
- Not available on macOS & iOS: Unfortunately, the NordVPN split tunneling is limited to Windows 7,8,10,11, Android mobile devices, and Android TV.
How to Check if NordVPN Split Tunneling Is Working?
Before I utilize the extra speed gains & other advantages, I ensure that my NordVPN app properly splits my connection tunnels. I’d also advise you to test it using these easy steps:
- Turn on the NordVPN split tunneling option and ensure that your primary browser is disabled from the VPN tunnel, as shown in the previous steps.
- Visit www.dnsleaktest.com using the primary browser. If the visible IP address is your real one, then split tunneling works fine.

- Optional: To cross-check, enable the VPN connection for the primary browser this time and rerun the DNS leak test. If the IP address comes out differently, then the feature runs flawlessly.

NordVPN Split Tunneling Not Working? 4 Easy Fixes
If you’re facing any complications with NordVPN’s split tunneling, here are four simple fixes to help you.

- Restart your device: This may sound obvious, but rebooting your device may solve underlying issues causing the feature not to function.
- Update and restart the app: Check for updates to the NordVPN software and install the latest version, if available. Restart the app to see if the problem persists.
- Downgrade the software: During my research, I found that some users who could not use NordVPN’s split tunneling on the latest app version downgraded to the previous versions, which worked for them. But I’d recommend you attempt the downgrading only if all the other methods fail to solve your problem.
- Speak to customer support: NordVPN’s customer support does an excellent job of assisting users with bugs and errors. So, try reaching out to them for an appropriate solution to fix the issue.
FAQs
Is NordVPN's Split Tunneling Safe?
NordVPN’s split tunneling is generally safe to use. However, it imposes some safety risks because your traffic and IP address get exposed whenever you access the internet without a VPN network.
So, you’re creating a hole that could be big enough to discharge your private data in your internet traffic protection model by using split tunneling.
Summing Up
Split tunneling is terrific for securing sensitive data while accomplishing high internet speeds on non-data-sensitive apps. NordVPN offers the best-in-class privacy, security, and anonymity, so combining these two cannot go wrong.
Even so, I’ve explained why it may be advantageous to you, its drawbacks, and the step-by-step procedure to enable it on NordVPN.
So, if you have a strong use case for this feature, streamline your internet activity by utilizing NordVPN for split tunneling today! Grab our exclusive discount on NordVPN and try split tunneling yourself, TODAY!


