You can set up NordVPN’s auto-connect on PC and smartphones by toggling the appropriate settings in its settings dashboard.
However, the VPN provider has different forms of auto-connect across devices. Sometimes, it only triggers when the device connects to a network type, while the auto-connect will also trigger on VPN launch for other devices.
Let’s dive into the NordVPN auto-connect set up across different devices.
How to Auto Connect NordVPN on App Launch?
NordVPN can be configured to auto-connect to any server once you launch the app. This can be when you auto-launch the app on device startup or manually launch it later.
Here’s how to set it up:
- Subscribe to NordVPN. Save with these discount offers.
- Download the NordVPN app. Note that this form of auto-connect is only possible on Windows and MacOS.
- Install and launch the NordVPN app. I’ll use the Windows PC app for this example.
- Click Settings > Connection.

- Toggle “Quick Connect on the app launch.”

- Wait a while as the VPN auto-connects for the first time.
You can now enjoy auto-connection whenever you launch the app.
Likewise, you can configure your PC to automatically open NordVPN on startup, triggering the server connection.
How to Set Up NordVPN’s Network-Based Auto-Connect?
You can set up NordVPN to auto-connect to a server once connected to a Wi-Fi network (such as public Wi-Fi), ethernet network, or mobile network.
This setup also allows you to configure the NordVPN server you want the app to choose automatically. Here’s what to do:
- Get a NordVPN subscription. Here are some one-time deals.
- Download the NordVPN app. You can set this up across its PC and smartphone apps, so I’ll demonstrate it with the Windows PC app.
- Install the app and launch it.
- Log in with your username and password.
- Click through Settings > Connection.
- Click the dropdown menu in front of “Auto-connect.”

- Choose what kinds of networks you want NordVPN to auto-connect on. I’ll choose “On Wi-Fi networks” for this demonstration.

- Click the dropdown menu icon, then select “Fastest server (Quick Connect)” to get a random (but fast) server on automatic connection.

How to Configure NordVPN’s Automatically Connected Server?
If you don’t want a random NordVPN server on auto-connect, you can specify which NordVPN server you get. You can even get as specific as picking specialty servers!
Follow the steps below:
- Follow steps 1-7 from above.
- Click the dropdown menu icon in front of “Auto-connect,” then select “Custom.”

- Choose the server type you want to automatically connect to. For instance, you can select P2P servers to trigger once you connect your Wi-Fi network for gaming.

- Leave the selection at “Fastest server” to allow NordVPN to choose the fastest server type of your selected category.
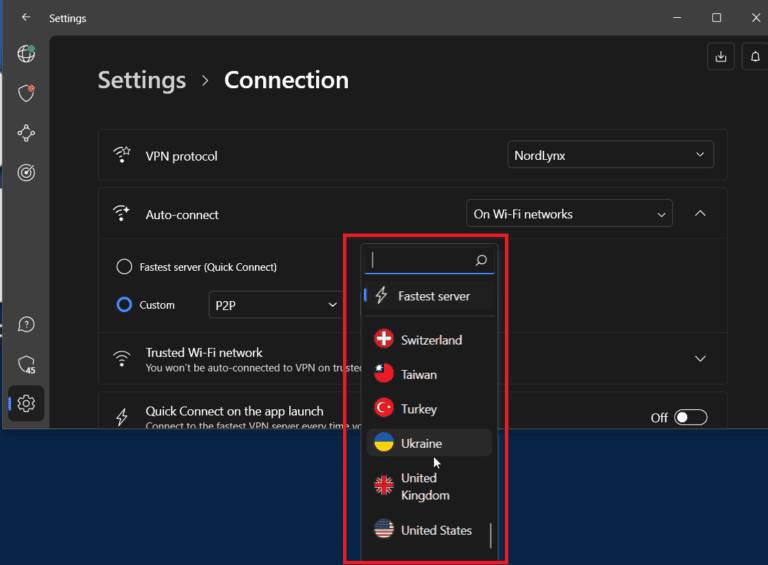
- Alternatively, click the selection to choose a server you want. I’ll select the United States.
- If the chosen location has city servers (like the US), you can select a city or let NordVPN pick the fastest city.

- I’ll choose New York for this demonstration.
- Open the list of available connections on your device. Since I chose Wi-Fi, I’ll open my Wi-Fi connection list.

- Connect to a network.
- Return to the NordVPN app. Then, click the dropdown menu before “Trusted Wi-Fi network.”

- Click “Trust this network” if you don’t want the auto-connect to apply to this Wi-Fi connection. Otherwise, leave it.
- Do the same for other mobile networks/Ethernet connections around you.
- Once set up, NordVPN will always connect to your preferred server on untrusted networks.
How to Turn Off NordVPN Auto-Connect?
You can turn off NordVPN’s auto-connect if you don’t want the VPN to trigger automatically on launch (PC) or certain network types (PC and mobile).
I’ll show you how to do both:
- Launch your NordVPN app.
- Click “Settings,” then “Connection.”
- Toggle “Quick Connect on the app launch” OFF if it was on.

- Click the first drop-down menu in front of “Auto-connect.”

- Uncheck all items you’ve checked. In my case, that would be “On Wi-Fi networks.”
- And you’re done!
If NordVPN was connected, you might have to disconnect it manually the first time for the change to take effect. But it’ll behave as configured subsequently.
Always-On Online Security!
When playing Overwatch at home, you may forget to encrypt your public Wi-Fi connections or connect to a secure gaming server. But once you’ve set up NordVPN’s auto-connect, you never have to worry about checking that box again.
Grab a NordVPN plan, follow the steps above, and enjoy secure internet coverage managed in the background.